Stencilling Hints & Tips
Adapted from “The Stencilled Home” by Helen Morris
Adhering a stencil to a surface
In my experience, the best way to secure your stencil is to use an adhesive repositioning spray. My personal favourite is 3M SprayMount. However, it cannot be sent through the post. A light misting of the SprayMount across the back of the stencil will last a long time without leaving traces of glue on your surfaces. This is valuable when stencilling fabric, using spray paint or if the stencil has large open shapes in the design. Follow the manufacturer’s safety instructions on the tin. A cheaper, but inferior alternative is to use our low-tack masking tape. A combination of both is good.
Dry-brush stencilling
Emulsion (latex) paint, acrylic and other water-based stencil paint will dry instantly if you use this method. Use a separate brush for each colour and ensure that they are dry before starting work. Our metallic range of paints are water based and colour fast on fabric.
 1. Shake up your paint so that it coats the inside of the lid, making a handy palette. Or, use another type of palette. Put just the tips of the bristles in the paint and circle the loaded brush onto a wad of kitchen paper. Employing a vigorous circling motion, as if you were stirring soup disperses the paint up the bristles. Do one last swirl or circle on a clean patch of paper towel to dry the tips of the brush.
 2. Before your first attempt at stencilling, do a test stipple on a piece of paper and run your finger instantly over the mark – if it smudges, go back to your kitchen paper. It is surprising how little paint you need and how far it goes. Stippling, or pouncing, is produced by tapping the flat end of the brush straight up and down onto your surface, keeping your brush at 90 degrees so that the bristles do not escape under the stencil bridges. Tap lightly; this should take very little effort.
3. Another method of stencilling is to swirl or circle the paint through the stencil and you use a gentle stirring motion as if stirring tea in a delicate china cup; just ‘tickle’ the paint through the stencil windows. Begin the stencilling motion on the film just outside your design area and ‘circle’ your way into the shapes. This is a faster application than stippling.
Stencilling with oil paint sticks.
The colours of these stencil crayons blend well and there is no chance of paint leakage but they are no longer made in their creamy original formula. We have a few colours left in stock. Brushes need to be used with these crayons to disperse the colour. Make sure that you have a clean, dry brush for each colour. Some crayons are colour-fast on fabrics always do a test piece and wait 72 hours before laundering.
 1. Use a dust sheet to protect surfaces from paint flakes and have kitchen paper handy to keep oily fingers at clean. Scribble colour from the oil stick onto a non-porous surface, such as a tile or stencil film. This will be your palette.
 2. Using a circling, stirring motion take up the scribbled paint into the stencil brush, work it well into the bristles. Use the same stirring motion to apply the colour through the pattern in the stencil. Start with the lightest colour and end with the strongest or darkest
3. In order to create shading, add deeper colour around the edges of the shapes.
A quick guide to shading and blending colour when stencilling.
When shading, start with the lightest colour and finish with the darkest. Follow this sequence and the order in which the colours were applied will be easily remembered. You then only need to take extra care in placing the last colour, as mistakes with paler colours can be covered up.
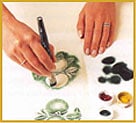
 1. Start by stencilling onto the surround of the stencil then work into the holes from the edges
2. Round shapes, such a fruit or balloons, benefit from gradually fading the colour towards the middle of the shape. This gives dimension to the shape, acting as a bloom on fruit, a shine on a balloon, or sunlight on a leaf. Yellow has been applied to some of the leaves on this stencil, which will merge with the green and red and make the image appear softer and more colourful.
 3. The next colour can now be applied wherever it is desired. The yellow leaves here are lightly covered with green, but the centre of the fruit has been left.
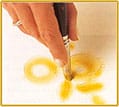
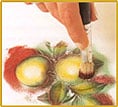 4. Finally apply your darkest shade, which will emphasise any outlines that you want to define. Keep the darkest or strongest colours to the edges of each shape so that the design edges are clearly visible. If you stipple or wiggle your brush onto the surround so that just a few bristles get to colour the shape, you will achieve delicate outlining. Note that the largest amount of red paint is on the outside, rather than the inside of the stencil pattern.
5. When repeating your shaded design, do not bother to replicate the first one – a similar effect will be better than an exact one.
Cutting a stencil.
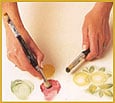
Although all our stencils are supplied ready cut you may want to experiment with cutting your own designs. If you have bought our book ‘The Stencilled Home’ you may want to cut the stencil designs included it the pages. We sell the raw stencil film, knives and pencils to help with your project. Use a self-heal cutting mat to cut onto. Hold a scalpel or craft knife like a pencil and make your cut smooth and continuous. Do not lift your blade more than necessary and always cut towards yourself and manoeuvre the stencil rather than the knife. Always have the manoeuvring hand behind the knife and never in front.
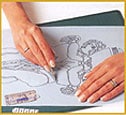 1. Cut out all areas to be stencilled as well as the registration marks. As you cut the stencil it will become floppier, so start with small details and work from the middle outwards. If you break one of the stencil bridges, repair it by placing sticky tape over the wound and cut the shape again through the tape.
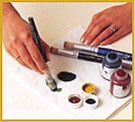
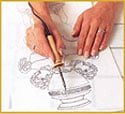 2. A heatpen or stencil burner can be used to cut stencils made from polyester film. Trace the outline of your design with the copper tip of the pen. The shape should pop out when cut. Do not forget to cut out any registration crosses. Cut on to glass or a special heat proof cutting mat when using a heatpen and select the 125 micron weight of stencil film when choosing stencil material